survey <- cleme="" esktop="" read.csv="" sers="" stringsasfactors="FALSE)<br" survey-covid.csv="">surveyFinalized<-survey br="" esponse="" finalized="" survey="" tatus="=">
names(surveyFinalized)[names(surveyFinalized) == "What.is.your.home.situation..you.are.in.living...."] <- br="" latorhouse="">names(surveyFinalized)[names(surveyFinalized) == "What.is.your.family.situation."] <- br="" situation="">names(surveyFinalized)[names(surveyFinalized) == "How.worried.are.you.about.the.impact.of.coronavirus.on.you.personally."] <- anxiety="" br="">
View(surveyFinalized)
surveyFinalized$situation[grepl( "without child", surveyFinalized$situation,fixed = TRUE)]<- br="" lone="">surveyFinalized$situation[grepl( "with child", surveyFinalized$situation,fixed = TRUE)]<- amily="" br="">
surveyFinalized$FlatOrHouse[grepl( "ppart", surveyFinalized$FlatOrHouse,fixed = TRUE)]<- br="" ppartment="">surveyFinalized$FlatOrHouse[grepl( "Apart", surveyFinalized$FlatOrHouse,fixed = TRUE)]<- br="" ppartment="">surveyFinalized$FlatOrHouse[grepl( "flat", surveyFinalized$FlatOrHouse,fixed = TRUE)]<- br="" ppartment="">surveyFinalized$FlatOrHouse[grepl( "city", surveyFinalized$FlatOrHouse,fixed = TRUE)]<- br="" ppartment="">surveyFinalized$FlatOrHouse[grepl( "country", surveyFinalized$FlatOrHouse,fixed = TRUE)]<- br="" ouse="">surveyFinalized$FlatOrHouse[grepl( "house", surveyFinalized$FlatOrHouse,fixed = TRUE)]<- br="" ouse="">
library("ggplot2")
surveyFinalized$anxiety<-factor all="" anxiety="" at="" br="" ery="" levels="c(" omewhat="" ot="" so="" surveyfinalized="" worried="" xtremely="">relevel(surveyFinalized$anxiety,"Very worried")
(d <- aes="" anxiety="" br="" depending="" eneral="" ggplot="" ggtitle="" on="" situation="" surveyfinalized=""> geom_jitter())
(d <- aes="" anxiety="" br="" depending="" eneral="" ggplot="" ggtitle="" latorhouse="" on="" setup="" surveyfinalized=""> geom_jitter())
mardi 12 mai 2020

vendredi 27 mars 2020
Docker campaign
My notes to startup docker:
Configure your internal docker repositoryFind your internal Trusted Repository
dtr.mycompany.com
In your : /etc/docker/daemon.json file
Make sure that you trust your repository:
{
"insecure-registries" : ["dtr.mycompany.com"]
}
curl -k https://dtr.mycompany.com/ca -o /usr/local/share/ca-certificates/dtr.mycompany.com.crt
update-ca-certificates
service docker restart
Allow the user (not root to use docker)
usermod -aG docker myusersu - myuser
newgrp
Create a docker file
Create the docker fileFROM dtr.mycompany.com/mycompany/httpd:latest
LABEL maintainer="clement_soullard@infosys.com"
EXPOSE 80
COPY dist/ui /usr/local/apache2/htdocs/
COPY docker/certs/server.crt /usr/local/apache2/conf/
COPY docker/certs/server.key /usr/local/apache2/conf/
COPY docker/httpd.conf /usr/local/apache2/conf/httpd.conf
RUN sed -i \
-e 's/^#\(Include .*httpd-ssl.conf\)/\1/' \
-e 's/^#\(LoadModule .*mod_ssl.so\)/\1/' \
-e 's/^#\(LoadModule .*mod_socache_shmcb.so\)/\1/' \
conf/httpd.conf
Useful commands
Stopping a container
docker stop specworks-ui
Removing a container
docker rm specworks-ui
docker image build -t specworks-ui:1.0 .docker container run --publish 8000:80 --detach --name specworks-ui specworks-ui:1.0
docker exec -it specworks-ui bash
docker network create -d bridge specworks-net
cp commands works recursively
docker cp docker/httpd.conf specworks-ui:/usr/local/apache2/conf/httpd.conf
Clean up the docker cache
docker system prune -a -fDownload image from proxy
mkdir /etc/systemd/system/docker.service.d
/etc/systemd/system/docker.service.d/http-proxy.conf that adds the HTTP_PROXY environment variable:[Service]
Environment="HTTP_PROXY=http://proxy.example.com:80/"
NO_PROXY environment variable:Environment="HTTP_PROXY=http://proxy.example.com:80/"
Environment="NO_PROXY=localhost,127.0.0.0/8,docker-registry.somecorporation.com"
$ sudo systemctl daemon-reload
$ sudo systemctl show --property Environment docker
Environment=HTTP_PROXY=http://proxy.example.com:80/
$ sudo systemctl restart dockerDocker in AWS ubuntu VM
The docker is installed with snap in AWS ubuntu images.
To unable the unsecurie registries
vi /var/snap/docker/current/config/daemon.json
{
"insecure-registries":["my-server.com:32000"]
}
To view the change
snap restart dockerdocker info | grep -A 5 "Insecure Registries"
jeudi 30 janvier 2020
Managing entries/password in LDAP from command line
First you have to install the utilities of openLDAP to connect to your LDAP. LDAP is a protocol, it means that you can use the openldap library to connect to other ldap like apache ds for instance:
yum install openldap-clients.x86_64
You can change the password using the admin bind account
ldappasswd -H ldap://:10399 -x -D "uid=admin,ou=system" -W -S "uid=bhashya_avula,ou=Persons,dc=mycompany,dc=com"
Or you can use the user account to change the password
ldappasswd -H ldap://,ou=Persons,dc=,dc=com" -W -A -S
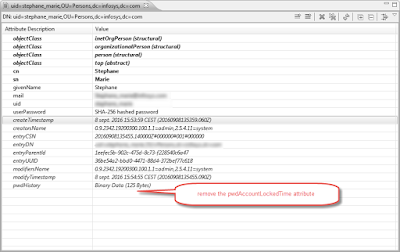
If the account is locked, you can unlock it using apache ds. First, make sure that your connection use display the operational information by checking the below box.
ldapsearch -H ldap://localhost:10389 -b "uid=admin,ou=system" -wXXXXX -s sub "(cn=Soullard)" +

Then remove the pwdAccountLockedTime attribute
yum install openldap-clients.x86_64
You can change the password using the admin bind account
ldappasswd -H ldap://
Or you can use the user account to change the password
ldappasswd -H ldap://
If the account is locked, you can unlock it using apache ds. First, make sure that your connection use display the operational information by checking the below box.
ldapsearch -H ldap://localhost:10389 -b "uid=admin,ou=system" -wXXXXX -s sub "(cn=Soullard)" +
Then remove the pwdAccountLockedTime attribute

vendredi 29 mars 2019
GIT sa mère
Proxy
Add proxygit config --global http.proxy myproxy
Remove proxy
git config --global --unset http.proxy
Credentials
resetgit config --global credentials.helper
jeudi 28 mars 2019
Gradle behind a corporate proxy
You can pass some arguments to gradle
-Dhttp.proxyUser=addomain\\myuser -Dhttp.proxyPassword=mypassword -Dhttps.proxyUser=addomain\\myuser -Dhttps.proxyPassword=mypassword -Dhttp.proxyHost=myproxy -Dhttp.proxyPort=80 -Dhttps.proxyHost=myproxy -Dhttps.proxyPort=80
mardi 31 juillet 2018
Continuous integration for JAVA/Angular 5,6 project on Jenkins with maven and npm
To build a project Angular on Jenkins, you need to mix two technologies: NPM and maven.
To do so you need first to prepare you image that will host jenkins.
apt-get install -y nodejs
npm config set strict-ssl false
cd myapp-client
npm install @angular/core
npm install --save-dev @angular/cli@6.1.1
./node_modules/.bin/ng update @angular/cli --migrate-only --from=1.7.4
./node_modules/.bin/ng build
cd ..
echo Successful completion of npm build
echo Building Webapp
cd myapp-webapp
echo Build started on `date`
mvn install
echo Successful completion of webapp build
To do so you need first to prepare you image that will host jenkins.
1 - install maven
Download maven and copy it into your /opt folder.2 - install npm
yum install npm3 - install node js
curl -sL https://deb.nodesource.com/setup_8.x | sudo -E bash -apt-get install -y nodejs
npm config set strict-ssl false
4- build your project
echo Building Client applicationcd myapp-client
npm install @angular/core
npm install --save-dev @angular/cli@6.1.1
./node_modules/.bin/ng update @angular/cli --migrate-only --from=1.7.4
./node_modules/.bin/ng build
cd ..
echo Successful completion of npm build
echo Building Webapp
cd myapp-webapp
echo Build started on `date`
mvn install
echo Successful completion of webapp build
jeudi 8 mars 2018
Filtering on IP and FQDN on HTTPD Virtual Host
Here is a sample file to filter on IP
NameVirtualHost *:80
ProxyPreserveHost On
#Redirection for www Host on another Website
ServerName www.mycompany-france.com
Redirect / http://www.mycompany.com/
#Redirection for error host to display the specific message "You are not authorized to access from this ip
ServerName error.
# Document to display in case of authorization refused# you may indicate in that document the procedure to follow to add an ip
ErrorDocument 403 http://error.mycompany-france.com/error/authreq.html
# The place where the IP are added.
Order deny,allow
Deny from all
Allow from 80.231.232.69 193.56.36.2 193.202.91.11 90.89.210.95
# The application server for My company work council
ProxyPass / ajp://localhost:8009/
ProxyPassReverse / ajp://localhost:8009/
ServerName workcouncil.mycompany-france.com
NameVirtualHost *:80
ProxyPreserveHost On
#Redirection for www Host on another Website
ServerName www.mycompany-france.com
Redirect / http://www.mycompany.com/
#Redirection for error host to display the specific message "You are not authorized to access from this ip
ServerName error.
# Document to display in case of authorization refused# you may indicate in that document the procedure to follow to add an ip
ErrorDocument 403 http://error.mycompany-france.com/error/authreq.html
# The place where the IP are added.
Order deny,allow
Deny from all
Allow from 80.231.232.69 193.56.36.2 193.202.91.11 90.89.210.95
# The application server for My company work council
ProxyPass / ajp://localhost:8009/
ProxyPassReverse / ajp://localhost:8009/
ServerName workcouncil.mycompany-france.com
Inscription à :
Articles (Atom)